Saturday, November 26, 2011
Fairy Tutu's
These are some additions I am adding into Christmas presents this year for my niece's and Ada. They are so easy to make, and I whipped these up in just over an hour - no sewing involved!
This is the tutorial I followed to make my first fairy skirt at the beginning of the year - http://lazymamadesigns.blogspot.com/2007/12/free-pattern-almost-no-sew-fairy-skirt.html
I want to make a big one for me now!!
Thursday, November 24, 2011
Christmas Stocking Advent Calender
I saw a picture of these small stockings in a magazine a few years ago, and its another one of those projects that I have finally gotten around to making. I love the idea of this as I can fill each stocking with whatever I like, including balloons, stickers, diecast cars etc and steer away from lollies if I choose.
I originally picked some beautiful black, green and red fat quarters but decided I needed something more cheery and appealing to the children so picked 6 bright fat quarters (24 stockings, 4 of each pattern).
Then made a stocking template to the size I wanted (allowing for a 1/4 inch hem).
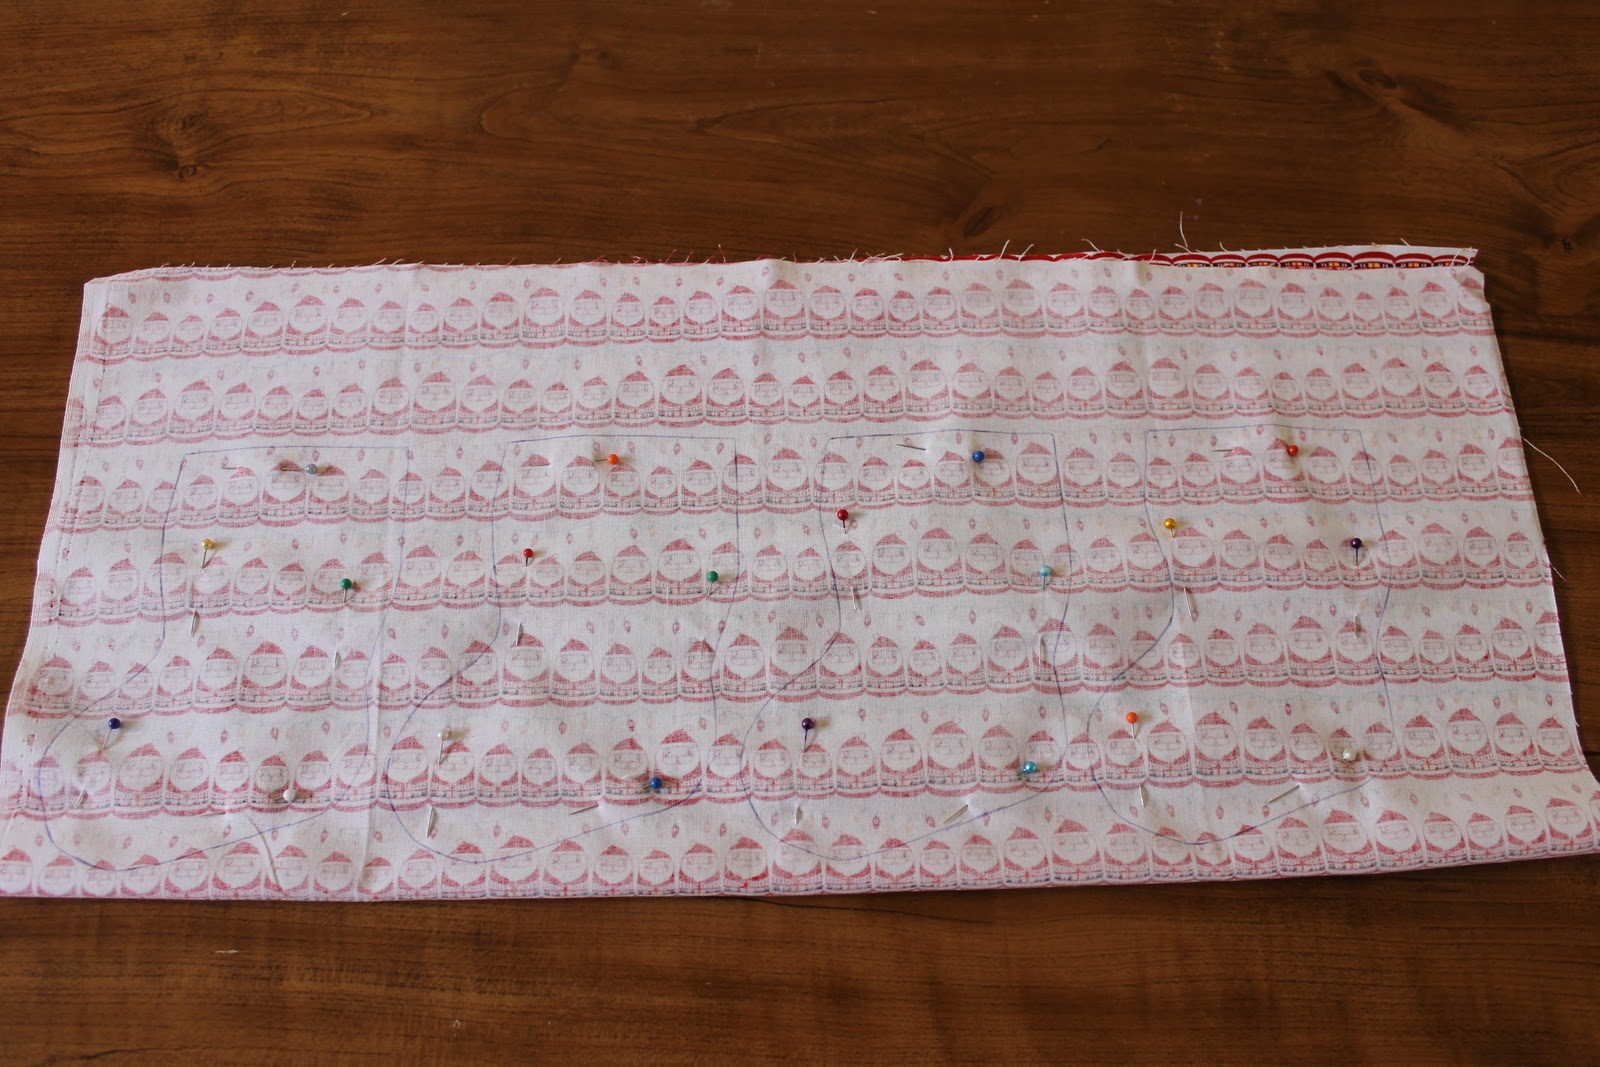
I then ironed and folded each fat quarter in half, with right sides facing, and traced four stocking outlines onto the wrong side of the fabric. I then pined them together inside the lines to hold them together when I cut them out.
I had some poplin in my fabric stash that I decided to use to line the stockings with, and cut the linings out the same way as above. This gave me 24 patterned stocking cut outs and 24 linings.
I then embellished the front of each stocking (not on the back), sewing ribbon etc into place.
Then, as pairs, I matched an outer to a lining, right sides together, and pined along the top (opening) of each stocking, and sewed across the top only.
I then opened the front and back of each stocking out (as below) and ironed the seams flat. Then right sides facing, joined together the front and back of the stocking and pined together. It took me quite a while to work out how I was going to sew these together with the lining, so all my seams were clean, but with a small headache I finally worked it out!!
I sewed around the whole stocking, joining front to back, leaving a small opening in the heel where I could turn the stocking the right way out.
This is what it looks like turned out the right way.
I ironed it (avoiding the ribbon), then pinned and sewed shut the small opening. I didn't bother slip stitching here to hide it, I just closed it with the sewing machine. I figure no-one will see it!
Then I pushed the lining down into the stocking, ironed it out (being careful not to iron the ribbon) and a mini stocking was born!
This was a time consuming project, not really something you can make overnight. I am so glad I took the time to make it though as I think it looks really effective and I can't wait to fill it with small goodies and start the countdown to Christmas with the children.
Friday, November 18, 2011
I Am Still Here!
I am still here! Its been an extremely busy couple of months between the children, business and a much needed holiday with the hubby! So there hasn't been much time left for any creation or new baking. With Christmas coming up though there will be lots of goodies being created, so I will start posting again very shortly. I am very close to finishing a great Advent Calander for Christmas - my sewing machine is at the shop being serviced, so the minute it is back I'll be finishing this.
The hubby and I just spent a week, childfree, in Bali. It was amazing and I indulged in some beautiful Indonesian food. Im feeling very inspired to start experimenting with my evening meals, especially with some of the delish desserts I tried! Here are a few pics of some of the amazing food we ate:
Jumbo Prawns and Red Snapper, hand-picked and cooked on the grill, at Jimbaran
Chicken Curry and Satay (ignore the hubby's rude gesture at the top of the photo!!)
A mixture of beef and chicken curry, pork slow cooked in soy, corn and coconut, beans and water spinach, tuna and chicken pieces served with rice and a cracker
We were lucky to be invited into a family compound just outside of Ubud during a bike ride, and this is the hubby enjoying some true Balinese coffee and snacks.
Snake Fruit - have never come across this before during my Asia trips. The hubby called it a 100 year old strawberry. It had an almost black thick outer skin, and the inner was similar to lychee, but hard and dryer, with a taste of sweet and sour.
I made a point of trying as many different drinks and foods as possible. This one unfortunately went down the sink! It was a bit bland tasting, but it was the chunks of jelly in it that I couldn't handle!
Friday, October 28, 2011
Cheats Caramello Chocolate Brownie
Before I start I should apologise for the terrible photo. This was taken in an extreme hurry, while the slice was still hot from the oven. I was in a rush - what do you do!
I realised first thing this morning I had forgotten to bake something for my fortnightly KiwiMums catch-up. It was just after 7am, I had to leave in 1.45 hours and in that time had to feed and dress 3 children, shower and dress myself, make lunches, clean up the kitchen and get the first load of washing on and bake something ... This is where I call on my secret stash of Betty Crocker. I always have a few of her cake mixes, brownie mix and a cookie mix stashed in the back of my cupboard for emergencies such as this.
Actually funny aside, Hubby found my secret stash the other day and was appalled, asking me if I actually ever baked from a box. Haha, one of his favourite brownies is this one from Baking Makes Things Better - he has no idea it comes from a box. Shock horror - two boxes. Shhhhhh.
Right, so back to the recipe. I needed something quick to whip up, so Betty Crocker Triple Fudge Brownie it was.
I have been given a Caramello Brownie recipe from a friend and have been wanting to give it a try, so decided to incorporate the caramello part of her recipe in this brownie.
Preheat the oven to the directions given on the box and prepare your brownie pan.
In a small pot mix 65grams of butter, 3/4 cup of sweetened condensed milk and a table spoon of golden syrup. Heat until melted and mixed together and set aside.
Mix together the brownie, following the instructions on the box and put the batter in the prepared pan. Swirl the caramel sauce through the top of the brownie.
Bake to box instructions (about half an hour). Halfway through baking I covered mine with tinfoil to stop the caramello on top from burning.
Leave to cool before cutting.
Wednesday, October 26, 2011
Bed Headboard Upcycle
About a year or so ago I brought a second hand rimu headboard for $10 and covered it for Sprats bed. Sprat and Danger Mouse recently were lucky enough to be brought new beds with headboards, so now this is being passed on to The Girl. Knowing that she more than likely won't be that keen on Lightening McQueen, I found some awesome fabric to recover it for her bedroom.
So here is how it started
Then became Lightening McQueen.
So firstly I removed the legs and then took off the old fabric.
I used the old wadding I had on there previously. This is just quilt batting. I then positioned the headboard on the fabric, making sure that the pattern I wanted was centered on the front of the board. As I wanted the back of the board to be the right way up (if I just pulled it over it would of been upside down), I had to cut the back piece of the fabric off, turn it around and sew it onto the front piece. The photos should explain this.
Below is the front and back pieces.
I then pinned, right sides together, ensuring they were the correct way and sewed together.
Once sewn, I ironed the seams flat. You can see here that the back piece is upside down now, but once flipped onto the headboard will be the right way up.
I then repositioned the wadding and the headboard onto the fabric, centering it correctly.
Starting at the bottom, I pulled the fabric over and fixed into place using a staple gun. I then pulled both sides in tightly and stapled. Finally I pulled the remaining fabric over and folding under a bottom hem, started from the centre and worked my way out, securing the fabric at the bottom (pulling tightly as I went). I then folded the sides in and stapled these down.
Getting something that looks like this. This is the back.
And the front.
Easy. Time to screw the legs back on. I used pins to find the screw holes and then just screwed them back on again.
And there you have it - an awesome headboard!
Next project for her bedroom is a single sized quilt, which I am hoping will match her headboard nicely. Here is a sneak peak.
Tuesday, October 25, 2011
Coffee Melt Biscuits
My Mum In Law introduced me to these biscuits and they become favourites with everyone who tries them.
150g butter
150g sugar
1 teaspoon instant coffee
1 teaspoon vanilla essence
1/4 cup condensed milk
1 egg yolk
2 cups flour
1 teaspoon baking powder
Chocolate buttons (I use Nestle Choc Melts)
Prehead oven to 180 degrees and line 2 baking trays.
Cream butter and sugar till light and fluffy. Add instant coffee, vanilla and condensed milk and beat until light. Beat in egg yolk then stir in sifted flour and baking powder.
Shape into balls and placed on baking trays. Allow room for spreading. Press a chocolate button in the centre of each biscuit.
Bake for approximately 15 minutes or until light golden brown.
Sunday, October 9, 2011
Milo Muffins
These are so good. I am going to try them with banana as well - yummy!
1 3/4 cups flour
1 1/2 teaspoons baking powder
2/3 cup sugar
1/2 cup milk
75 grams softened butter
1 egg
1 teaspoon vanilla extract
1/4 cup Milo blended with 2 tablespoons of boiling water
3/4 cup chocolate drops
Preheat the oven to 190 degrees and prepare a 12 hole muffin tin with papers.
In a medium sized bowl sift together flour, baking powder and sugar. In a large jug combine the milk, butter, egg, vanilla extract and Milo mixture. Pour the milk mixture and the chocolate drops into the flour and stir until just combined.
Divide the batter among the muffin holes and bake for 20 - 25 minutes or until cooked.
Serve dusted with icing sugar.
Subscribe to:
Posts (Atom)