Wednesday, April 20, 2011

Sour Dough Bread

So a week ago I made a start on my Sour Dough Starter and it worked beautifully.  So here are the instructions to make the bread.

In a BIG bowl put in order 4 cups of starter, 5 cups of flour, 1 tablespoon of salt and 3 cups of water.  With a wooden spoon, knead the mixture for at least 5 minutes.  It starts getting thicker as the gluten fibres come together. Its meant to look and feel like goo (consistency of gooey, wet oatmeal porridge). If this spills wipe up straight away as when it dries it sticks like superglue ... so I discovered.

Put in greased pans to rise (I used a wet ceramic cup to flop it into the pans and filled each pan to halfway), and should fill 3 pans. Raise for at least 7 hours to get a good rise. I just leave mine sitting on the oven top all day, don't worry about a warm place.  All the phytates in the bread will be removed as well after this time.

All ready to rise

Nicely risen after 8 hours

Then bake at 180 degrees for one hour and hey presto, yummy sour dough bread. The key to success of this recipe is have a reasonably wet dough which will give you soft loaves. You can add all sorts of stuff - sunflower seeds, linseeds, pumpkin seeds etc..   Enjoy!


Tuesday, April 19, 2011

First Attempt at Softies

I am totally loving my Softies book, and think I may have to get the second one.  And start creating some of the little creatures that invade my imagination.  So far have made a few Mabel Monkeys and a Cosmonaut.

Can't recommend this book enough, as the instructions are so easy to follow and the toys really are just devine and make great presents.

Here are my first few attempts:


My very first which I made for Ada.


Monkey and Cosmonaut - presents for some of the children at my KiwiMums group.


My favourite fabric combination so far.  Photo just does not do it any justice - she's a cutie!  Wish I could of gotten a daytime photo of her, but she left tonight and I only just finished her a few minutes before she left!

Name Wall Hanging

I wanted to make Ada a wall hanging with the letters from her name.  I am not at all a paint or paper crafty type person but am pretty darn happy on how this turned out.  Lets hope it stays up on the wall!

So, what I used was:  paper mache letters, paint, co-ordinating scrapbooking paper, embellishments, ruler, pencil, paint brush, craft knife, adhesive spray glue and some 3M adhesive strips.


First off, before painting the letters I outlined the letter on the wrong side of the paper, ready for cutting out.  Don't forget, if needed, to draw your letters back to front, so when cutting out they are the right way around.  None of mine needed to be drawn this way, but being a bit blonde when it comes to stuff like this, I drew them back to front anyway.   Of course it made no difference ... hmmm.


Then I painted my letters.  I left one side unpainted (side where the paper is going), except for a small border, and gave the letters a couple of coats of paint.  Below is the back of the letters.


And this is the front:


Then I cut the letters out of the scrap book paper, sprayed with adhesive glue and stuck them on.  Easy peasy.


Decided they didn't need much embellishing as the paper is pretty awesome, so put a couple of butterflies and a crystal flower on them, attached the 3M strips and popped them on the wall.  They look great and were really easy!


So with her letters, butterflies and new mobile I made, her bedroom is starting to look nice a girly.


Saturday, April 16, 2011

Pumpkin Soup Bliss

Its raining and totally miserable outside today.  Kids are running rampent inside and I decided I felt like I needed a bit of warm comfort food.  And nothing is better than pumpkin soup!  Someone was doing a bit of fundraising last week at church and I picked up a nummy homegrown pumpkin for $2. 


Making pumpkin soup is such a cheap and filling meal, can be frozen and to me is just total, rainy day, comfort food.

I use a really basic recipe that is cheap, easy to throw together and tastes devine.

So what you need is:

Pumpkin
Onions
Garlic
Curry Powder
Nutmeg
Stock (chicken or vegetable)

Chop up around 1 - 1.5kgs of pumpkin, (just depending on how many you want to feed, if you are freezing etc), a couple of onions and 3 cloves of garlic.


In the pot you want to make the soup in, saute the onions and garlic in a couple of tablespoons of butter, until they are soft.

Chuck in the pumpkin, 3 - 4 cups of water, a teaspoon of curry powder, couple of teaspoons of stock and some nutmeg (couple of pinches).  Cook until pumpkin is tender and then puree all together.  I then add milk to mine to get the consistency I want.  Can garnish with sour cream, parsley etc but I am boring and just eat mine as it is.  Its good.

Wednesday, April 13, 2011

Family Dining

I have a wee confession to make.  Where should I start.  I am a bit of a stickler about dining together as a family each night.  Many a time have I harped on to hubby about the benefits of eating together as a family - its a time for sharing, talking, prayer etc, and that its really important for us to sit together around the table as a family.

So since I have started sewing my heart out, I have kinda taken over the dining room table.  I started by packing up my machine etc each day as I finished, but it kind of evolved and now it seems a permanent fixture on our table.  In fact the other day I cleared up my mess on the dining room table - it took me half an hour....thats how evolved it is...   Each night we eat as a family still - but around the kitchen bench now, with the children on the bar stools and the adults on the opposite side facing them.  We still have that family time together, but its a bit uncomfortable and its hard to get the TV turned off etc.

Hubby pointed this out to me last night.  That if it was him taking over the dining room table, I would probably have something to say about it.  And do I think its really fair that I am so adament about family dining, and I have taken away the place where we can most comfortably do it.  And you know, he is so right!!

So have I packed away all my sewing stuff tonight so we dine together comfortably around the table, instead of around the kitchen bench?  Not quite yet - I've actually spread more stuff over the table as I embark on yet another new project.... but I am going to organise myself better.  I am off tomorrow to buy a plastic box, and am only going to have one project out at a time so that it can easily get packed up into the child proof box before dinner, clearing the table so we can dine together comfortably. 

Haha so on a lighter note hubby has brought up a very valid point - that we need a bigger house with a sewing room ...

Tuesday, April 12, 2011

Making Buttons

I haven't had any decent time today to do any crafting.  After meeting with the accountant and coffee group, on top of the rest of the other mummy duties my day just disappeared.  But I did find a few minutes over a cup of tea to cover some buttons.

I have always wanted to give this a go and got some kits for my birthday.   So I picked some fabric that I thought was cute.


And five minutes later I had buttons!


Am not too sure what I am going to do with them yet.  I have two of my niece's birthdays coming up, so may make some headbands and attach these.  Over at Sew Pretty is an awesome tutorial on how to make headbands, so may give them a go and incorporate these buttons.  Check it out: http://sewprettyfabric.blogspot.com/2011/02/designer-hairband.html

Here is Ada supervising my button making attempts:


Monday, April 11, 2011

Sour Dough Starter

Last year we were on a really tight budget for a while, so I started to make Sour Dough Bread as it was really cheap, filling and lasted ages in the cupboard.  A beautiful friend of mine was successfully making it, so I was lucky enough to get starter from her.  Hubby loved it, and would eat it straight from the oven, dripping with butter, or he would make piles of cheese toasties from it. 

He asked me a few days ago if I would make it again, so today I have made a start on my starter.  I got the instructions from the wonderful ladies at Above Rubies.  Because I have a smaller family I have adapted it a bit to suit my family size, and I just use good ole wholemeal flour from the supermarket.

Firstly steralise a bowl (I just use it straight from the dishwasher while its still hot or you can pour boiling water over it).  Add a cup of wholemeal flour and a cup of pure water.


I had no wholemeal flour so I made a mad dash to the supermarket.  Then they had no 5kg bags so had to go a small bag until the bigger ones come in!

Keep it on the kitchen bench covered with a breathable cloth.  I had no cheesecloth so I 'borrowed' one of the baby's muslin cloths to cover mine with!  I am not sure if this is enough to let it breathe properly, so I'll probably give it time during the day without the cloth.  Everyday, for seven days, swap it into a new clean steralised bowl and add a half cup of water and a half cup of flour.  The purpose for swapping into a new bowl is to make sure you don't catch any bad yuccies that will kill it.


After seven days the starter should be bubbly and smell really sour and yeasty.  It does settle and get a film of water over the top each day - thats OK - just stir.

Don't ever use metal in your starter - it will kill it.  Stir with a wooden spoon and use ceramic or glass bowls.

Once your starter is ready, switch it into a clean bowl - this is where it will now live.  Clean its bowl once a month, and feed it daily with a half cup of flour and a half cup of water.

If my starter lives, I will post a recipe on how to make the bread.  Fingers crossed in seven days I have nice yeasty starter and not dead smelly gloop!!

Sunday, April 10, 2011

Jacks Blue Cupcakes


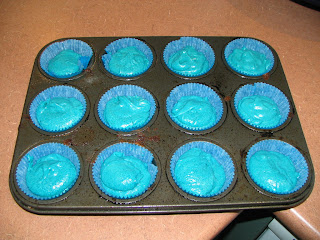
Jack was feeling pretty down today, so I asked him what we could do together to cheer him up.  He suggested making cupcakes, and wanted them totally blue.  I just brought a new Wilton tip as I really want to start to create better looking cupcakes and was itching to give it a go.  I use the vanilla cupcake recipe from the Australian MasterChef series - its so simple and has never failed on me yet.

100 grams soft butter
185 grams sugar
1 teaspoon vanilla
2 eggs
200 grams self raising flour
1/2 cup of milk

Preheat oven to 180 degrees.  Line muffin tins.

Beat butter, sugar and vanilla until pale.  Add eggs, one at a time and beat until just combined.  Add flour and milk in alternate batches and stir with a wooden spoon till just combined.  Add any flavourings or colourings.  Spoon into paper cases and bake for 15 - 20 minutes.


To make Jacks blue cakes, I added nearly 2 tablespoons of supermarket grade food colouring. 


Lets just say they weren't really a hit with Jack, but Sam and I ate them - they tasted amazing!!  I probably need more practice with the icing, but for a first try I thought I did pretty good.